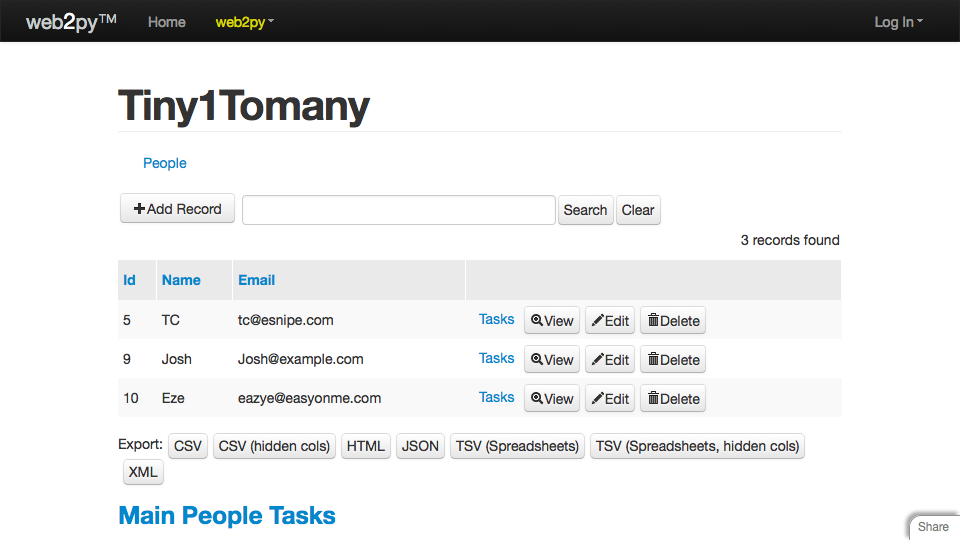
This web2py tutorial has everything you need to create a To Do list featuring a list of users stored in one table, a task database stored in another table, and how to create a one to many relation ship between a user and that user’s list of tasks. It is a complete, feature-rich, database-backed web application and is very near production ready in a total of about 20 lines of Python and about 30 lines of HTML. Many of its features are supplied by the all-purpose web2py SQLFORM.smartgrid control.
Features of this application
In just a few dozen lines of code, we will soon have a web app that could be used as an awesome prototype or even be deployed for internal use:
- You can enter, edit, delete, and search tasks
- You can enter, edit, and create user (person) records
- Relations are enforced. You cannot have duplicate people (that is, more than one person with a given email address). If a person has tasks, they are always visible and available in a single click. If you are viewing a record for a person, then choose to add a task, the task is related to that person automatically. If you delete a person, all that person’s tasks are deleted too.
- web2py automatically chooses the best possible UI for each case. For example, when entering a task the Created By field is a dropdown whose contents are drawn from a database of people. When entering a task priority from 1-5, the dropdown represents priorities as labels instead of numbers.
- Error messages are displayed based on business and database rules. If you try to create a task with no title, for example, that field will be highlighted and an error message displayed adjacent to it.
- You can sort by any column on any grid simply by clicking on the column title
- It’s translation ready. Most text visible to the user is displayed using the T() method, which automatically creates a translation database of all these strings.
Create the application
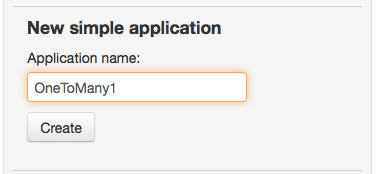
Create an application named OneToMany1 using the admin interface:
Create the models (define the database)
This blog is largely dedicated to documenting the creation of full-fledged web2py applications with the least work possible. One of web2py’s nonpareil strengths is that you create and modify (i.e. migrate) your databases and tables with pure Python code. There’s rarely a need to use database administration tools or to write raw SQL (which can post security issues).
The Person model
Records in the To Do list are simple with fields (columns) for Description, Priority, etc. but one field contains a reference to the creator, so we create a Person table. This will let us show a list of tasks assigned to one person. There is a one to many relation between people and tasks or to state it another way: A person has many tasks.
Add this code at the bottom of db.py:
file: /models/db.py
db.define_table('person',
	Field('name'),
	Field('email',unique=True,notnull=True),
	format='%(name)s')

db.person._plural='People'
Lines 1-4 create a table called person with a field called name and one called email. As you’ll see below normally you’d declare field types, but web2py defaults to a string type, and has a default lengthof 512. (You are not guaranteed that the default field length will always be 512.)
Line 3 has a field constructor (which defaults to type string, as usual) with two named arguments you should see frequently in a relational database application. notnull=True means that the field cannot be empty when the record is inserted into the database. unique=True ensures that only one person can use this email address.
We’re going to use web2py’s jack-of-all-trades SQLFORM.smartgrid control to do all the heavy lifting for viewing, creating, editing, and searching data. SQLFORM.smartgrid generates HTML labels and link names from the database schema. Like Ruby or Django web2py can pluralize words. The person table would pluralize as persons, so line 6 shows how to use the _plural attribute to make it people instead.
You’ll remember from the web2py tutorials that an id field is created by default (this behavior can be overriden)
The task model
A to do list consists of tasks. Here’s how you’d define the task table.
file: /models/db.py
db.define_table('task',
	Field('title',unique=True,notnull=True),
	Field('description','text'),
	Field('priority','integer',default=3,
		requires=IS_IN_SET([1,2,3,4,5],
		labels=[T('Very low'), T('Low'), T('Medium'), T('High'), T('Very High')],
  		zero=None)),
	Field('completed','boolean',default=False),
	Field('created_by','reference person'),required=False)
Line 2 shows that the title is the only required field, and that it must be unique. Arguably one could leave off the uniqueness requirement; what if lots of bugs were entered with the phrase ‘change background color’? Wouldn’t be the end of the world.
Line 3 shows the description field constructor, and for the first time a non-default field type is used. A description could go on for paragraphs or even pages. The text field type allows for essentially unlimited text entry.
web2py: display strings in an integer field using requires=IS_IN_SET()
Lines 4-7 get very interesting, and show off web2py’s data entry widgets spectacularly. The code>priority field only allows integers (whole numbers). requires=IS_IN_SET([1,2,3,4,5] means that only the numbers 1-5 can be used. Neat.
But it gets much better. Storing the priority as an integer is good for sorting but does 1 mean most important or least important? We solve this problem using labels=[T('Very low'), T('Low'), T('Medium'), T('High'), T('Very High')]. This displays a value of 1 as Very low, a value of 2 as Low, and so on, when you enter data.
Use the T() operator (see line 6 for an example) for any text users see other than table or field names. It gets added to a localization database so all such strings can be translated from a single location.
A sensible default value for a todo item’s priority is Medium, so default=3 means that if the user just types in a title (the only required field) and presses Enter the record will be entered with good defaults.
In line 8, Field('completed','boolean',default=False) allows a single Boolean (true/false) value. web2py will render a radio button control there, though you can override that behavior as you can with any data entry controls in web2py.
web2py: populate a dropdown from a database table
Line 9 is the jewel in this app’s crown. Specifically, it is the 'reference person' argument of the field constructor Field('created_by','reference person',required=False). What it means is “create a relation between any and all tasks assigned to a particular user”. Normally this requires some ugly SQL code by it’s a doddle for web2py. Even creating the user interface to express this relation requires a single argument in the SQLFORM.smartgrid constructor.
The 'reference person' also instructs web2py to use a dropdown containing all person records when the SQLFORM.smartgrid is rendered.
web2py required vs requires: required works at DAL level, requires at form level
Line 9 also shows the required=False parameter, which is enforced at the database level through this DAL call. Don’t confuse it with required, which works only at the form level. See the helpful answer to a question about this at web2py, one to many, not required relationship on stack overflow.
Create the controllers
Web2py automatically creates REST applications. Each controller name becomes the basis of a REST endpoint. For example, naming the a controller method person() and placing it in the /default directory reates a URL look something like this: https://127.0.0.1/tiny1tomany/default/person.
The person() controller method
The person controller is easiest. Add the following to default.py:
file: /controllers/default.py
def person():
    return dict(grid=SQLFORM.grid(db.person,user_signature=False))
This generates a SQLFORM.grid, giving it the creative name grid and passing it the person table. It assigns the grid to a dictionary and returns that dictionary from the function.
The view method will be passed this dictionary and will render it as HTML.
The task() controller method
The task controller is very similar, but you pass in the task table instead. Add the following to default.py:
file: /controllers/default.py
def task():
	return dict(grid=SQLFORM.grid(db.task,user_signature=False))
The index controller method
The index() method is your app’s “home page”. It is similar to the person() method but it shows a linked named Tasks that leads to a table consisting of only that person’s tasks.
Replace the index() method in default.py with the following:
file: /controllers/default.py
def index():
    return dict(grid=SQLFORM.smartgrid(db.person,linked_tables=['task'],user_signature=False))
The index controller method looks similar to the one for person, but it has an additional named parameter: linked_tables=['task']. This specifies which columns we want linked to their respective records.
The linked_tables=['task'] argument is optional. If you left it out, the grid would look and function exactly as it does now. It’s good practice to include this argument because if you have multiple columns that related to other tables you can decide which relations get exposed.
Create the views
Each controller method needs a matching HTML view file. For example, in default.py there is a method named index(). Its existence means that the web2py router expects a file called index.html in the directory named /views/default.
Create the index.html view file
Replace the contents of index.html with the following:
file: /views/default/index.html
{{extend 'layout.html'}}
{{if 'message' in globals():}}
<h3>{{=message}}</h3>
{{pass}}
{{=grid}}
<h3>{{=A(T('Main'), _href=URL('index'))}} {{=A(T('People'), _href=URL('person'))}} {{=A(T('Tasks'), _href=URL('task'))}}</h3>
Not much to it, except for Line 5. The meat is in {{=grid}}. The index() method in default.py created a variable named grid and returned it to the view. The view renders HTML based on returned values.
Line 7 is a link to the main page itself. (It makes sense because there are generated pages using this as the starting point, for example, if you add a task to a person’s task database.) The code for the link looks a little complicated. The {{=A())}} helper is a web2py function that generates a standard HTML A link. The anchor text is visible to the user, so it uses the T() operator to aid localization.
The URL is generated using _href=URL('index')), and it’s how you should normally generate links in web2py because it knows about controllers.
{{=A(T('Main'), _href=URL('index'))}}
For example, _href=URL('index')) is equivalent to _href=URL('default', 'index')) because it knows about relative paths. Should you later decide to move the URL to another controller, say one named /projects/index, you’d just change the URL to _href=URL('projects', 'index')). This is also easier to reuse, because relative paths are better for a component approach.
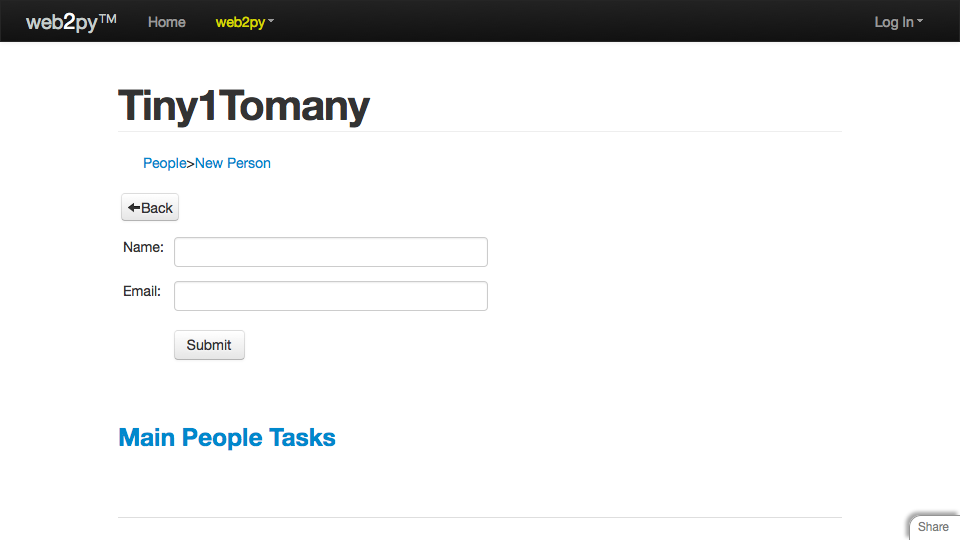
Create the person.html view file
The view file for the person model is very similar.
file: /views/default/person.html
{{extend 'layout.html'}}
{{if 'message' in globals():}}
<h3>{{=message}}</h3>
{{pass}}
<h2>{{=T('People')}}</h2>
<h3>{{=A(T('Main'), _href=URL('default','index'))}} {{=A(T('Tasks'), _href=URL('task'))}}</h3>
{{=grid}}
Here’s the form web2py generates based on this view file and the person model. Note the breadcrumb trail (People>New Person) generated automatically by the grid control.
Create the task.html view file
The view file for the task model is almost identical to persons.
file: /views/default/task.html
{{extend 'layout.html'}}
{{if 'message' in globals():}}
<h3>{{=message}}</h3>
{{pass}}
<h2>{{=T('Tasks')}}</h2>
<h3>{{=A(T('Main'), _href=URL('default','index'))}} {{=A(T('People'), _href=URL('person'))}}</h3>
{{=grid}}
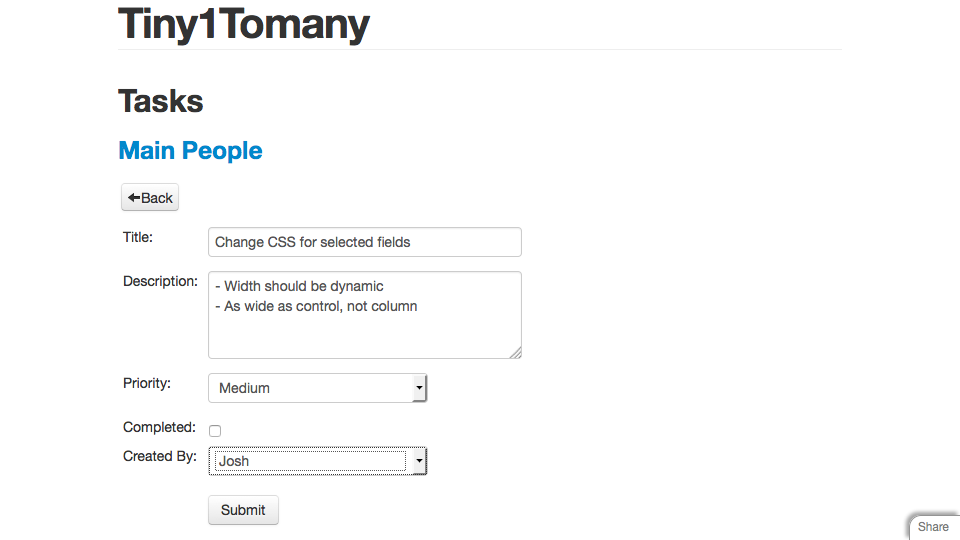
This grid shows two dropdowns generated automatically because of parameters in the Task model declaration.
web2py requires=IS_IN_SET example
Priority is a number from 1-5. To constrain it to those values, use the requires=IS_IN_SET([1,2,3,4,5] argument in the Field constructor.
web2py generate dropdown text/labels from numeric field
Note how the Priority field is represented as text instead of numbers. That comes from the
labels=[T('Very low'), T('Low'), T('Medium'), T('High'), T('Very High')]Field constructor.
web2py dropdown populated from database table
The Created by field can’t be typed in directly. It is a dropdown populated from the Persons table. All the UI for this is wired up automatically by web2py in the task.html view thanks to by the reference person portion of the Field constructor: Field('created_by','reference person',required=False))
Notes
- If you were to use this To Do app in real life, you would have to modify it slightly by removing the
personmodel and using web2py’s infinitely more robust user and authentication features, - For the same reason, you would remove all
occurrences ofuser_signature=Falseand decorate most controller methods with@auth.requires_login()as described in web2py’s Authentication chapter. - You might or might not use the built-in grid controls in production, but in these examples whole tables are passed to SQLFORM.grid and SQLFORM.smartgrid controls. If your to do list ends up more than a few hundred records, you’d want to refactor a little. SQLFORM.grid can take a query, not just a table, so you could create a query that restricted results by user, completion date, and so on to reduce a server round trip.
Recent Comments